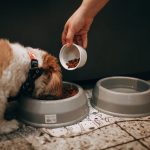
When it comes to your furry friend’s health, ear care is often overlooked. Yet, keeping your dog’s ears clean is crucial for their overall well-being.
If you’ve noticed a foul smell, excessive scratching, or dark discharge, it’s time to pay attention. A clean ear can prevent infections and discomfort, ensuring your dog stays happy and healthy. In this Dog Ear Cleaning Guide, you will discover simple steps to safely clean your dog’s ears at home.
You’ll learn what tools to use, how often to clean, and what signs indicate a problem that requires veterinary attention. Don’t let ear issues sneak up on you—your dog deserves the best care. Keep reading to become a pro at ear cleaning, and give your pup the comfort they need!
Signs Of Ear Issues
Recognizing ear problems in dogs is crucial. Many signs indicate potential ear issues. Early detection can help prevent serious problems. Look out for these key symptoms. They can point to infections or other conditions.
Excessive Scratching
One of the first signs is excessive scratching. Dogs may scratch their ears often. This behavior suggests discomfort or irritation. Pay attention if your dog seems fixated on its ears.
Head Shaking
Frequent head shaking is another warning sign. Dogs shake their heads to relieve discomfort. If your dog shakes its head often, check its ears. This action can indicate an underlying issue.
Odor From The Ears
A foul smell from the ears is concerning. Healthy ears should not have an odor. A bad smell often points to infections. It is essential to investigate further.
Redness Or Swelling
Look for redness or swelling in the ear canal. Inflammation can signal infection or irritation. A healthy ear should have a pink, healthy appearance. Any change in color needs attention.
Discharge From The Ears
Discharge is another important sign. It can be brown, yellow, or even black. This discharge can indicate ear infections or mites. Always consult a vet if you notice unusual discharge.
Changes In Behavior
Changes in behavior can also signal ear issues. Your dog may become more withdrawn or irritable. They might also avoid ear touches. Notice any changes in your dog’s usual behavior.
Common Causes Of Ear Problems
Ear problems in dogs can stem from various sources. Identifying these causes helps in prevention and treatment. Each issue requires attention to keep your dog’s ears healthy.
Ear Infections
Bacterial or yeast infections are common in dogs. Allergies often trigger these infections. Excess moisture also plays a big role. Underlying health conditions can make infections more likely. Regular ear checks can help catch infections early.
Ear Mites
Ear mites are tiny parasites that cause discomfort. They lead to intense itching and irritation. You’ll notice dark debris that looks like coffee grounds. This debris comes from the mites and can indicate a serious issue. Veterinary care is crucial to remove these pests.
Foreign Bodies
Sometimes, foreign objects get stuck in the ear canal. Grass awns, like foxtails, are common culprits. These can cause pain and lead to infections. Always check your dog’s ears after walks. This simple step can prevent bigger problems.
Choosing The Right Cleaning Tools
Choosing the right cleaning tools for your dog’s ears is crucial for maintaining their ear health. The right tools not only make the process easier but also ensure that you don’t accidentally harm your furry friend. With so many options available, it’s important to know what works best for your dog’s specific needs.
Essential Cleaning Tools
Start with the basics. Here are some essential tools you should consider:
- Ear Cleaning Solution:Look for a gentle, veterinarian-recommended solution designed specifically for dogs. Avoid anything that contains alcohol or harsh chemicals.
- Cotton Balls or Pads:These are great for applying the cleaning solution and wiping away debris. They are soft and won’t irritate your dog’s ears.
- Soft Cloth:Use a clean, damp cloth to gently wipe the outer ear. This can help remove excess dirt and wax.
Having these tools on hand makes the ear cleaning process smoother. You can prevent infections and other issues by regularly maintaining your dog’s ear hygiene.
Avoiding Harmful Tools
It’s essential to avoid certain tools that can cause damage. Q-tips are a big no-no. They can push debris deeper into the ear canal and even cause injury.
Additionally, steer clear of any products containing hydrogen peroxide or alcohol. These can irritate the sensitive skin inside your dog’s ears. Remember, your goal is to clean, not to cause discomfort.
Choosing The Right Size
Consider your dog’s size and breed when selecting cleaning tools. Larger dogs may require bigger cotton pads, while smaller breeds need smaller ones. It’s all about comfort and effectiveness.
For instance, I once used a large cotton ball on my small terrier, and it was too much for her. She was uncomfortable, and it made the cleaning process stressful. Finding the right size can save you and your dog from unnecessary anxiety.
Consulting Your Veterinarian
If you’re unsure about which tools to use, don’t hesitate to consult your veterinarian. They can recommend specific products based on your dog’s ear health. This is especially important if your dog has a history of ear infections or sensitivities.
Your dog’s ear health is not something to take lightly. What tools have you found most effective in keeping your dog’s ears clean? Share your experiences and tips to help other pet owners!
Credit: pilotknobah.com
Step-by-step Cleaning Process
Cleaning your dog’s ears is essential for their health. Follow a simple step-by-step process to ensure thorough cleaning. Start by gathering your supplies, then gently wipe the outer ear. Use a vet-approved cleaner for the inner ear, ensuring you avoid the ear canal.
Regular cleaning keeps ears healthy and free from infections.
Cleaning your dog’s ears is an essential part of their grooming routine. A proper ear cleaning process helps to prevent infections and keeps your furry friend comfortable. Here’s a detailed step-by-step guide to ensure your dog’s ears stay clean and healthy.
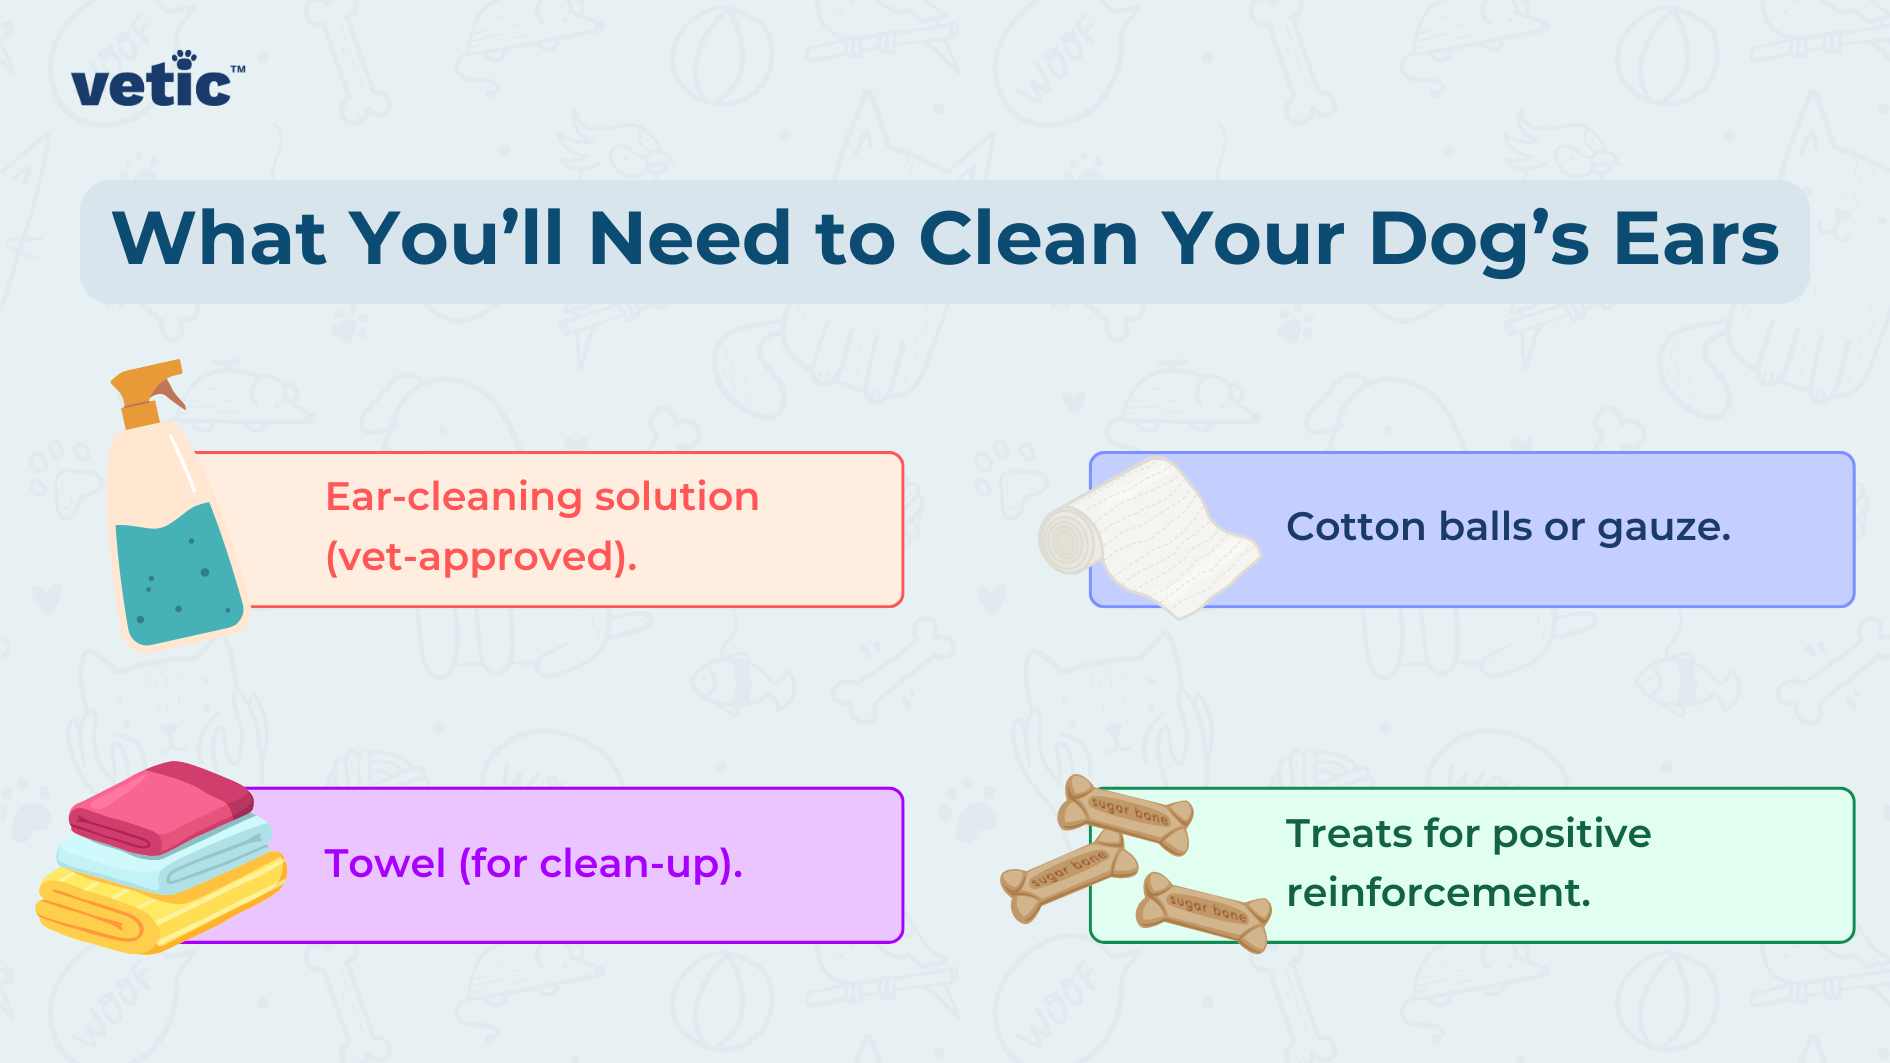
Gather Your Supplies
Start by collecting all the necessary supplies. You will need:
- Dog ear cleaning solution
- Soft cotton balls or gauze
- Treats for positive reinforcement
- Towels to catch any mess
Having everything ready makes the process smoother. You want to ensure your dog feels secure throughout.
Choose The Right Time
Timing can make a big difference. Pick a moment when your dog is calm and relaxed. After a long walk or playtime can be ideal. If your dog is anxious, consider using treats to create a positive association. A relaxed environment will lead to a more effective cleaning process.
Examine The Ears
Before you start cleaning, take a close look inside your dog’s ears. Look for:
- Redness or swelling
- Unpleasant odor
- Excessive wax or discharge
If you notice any concerning signs, consult your veterinarian first. Your dog’s health should always come first.
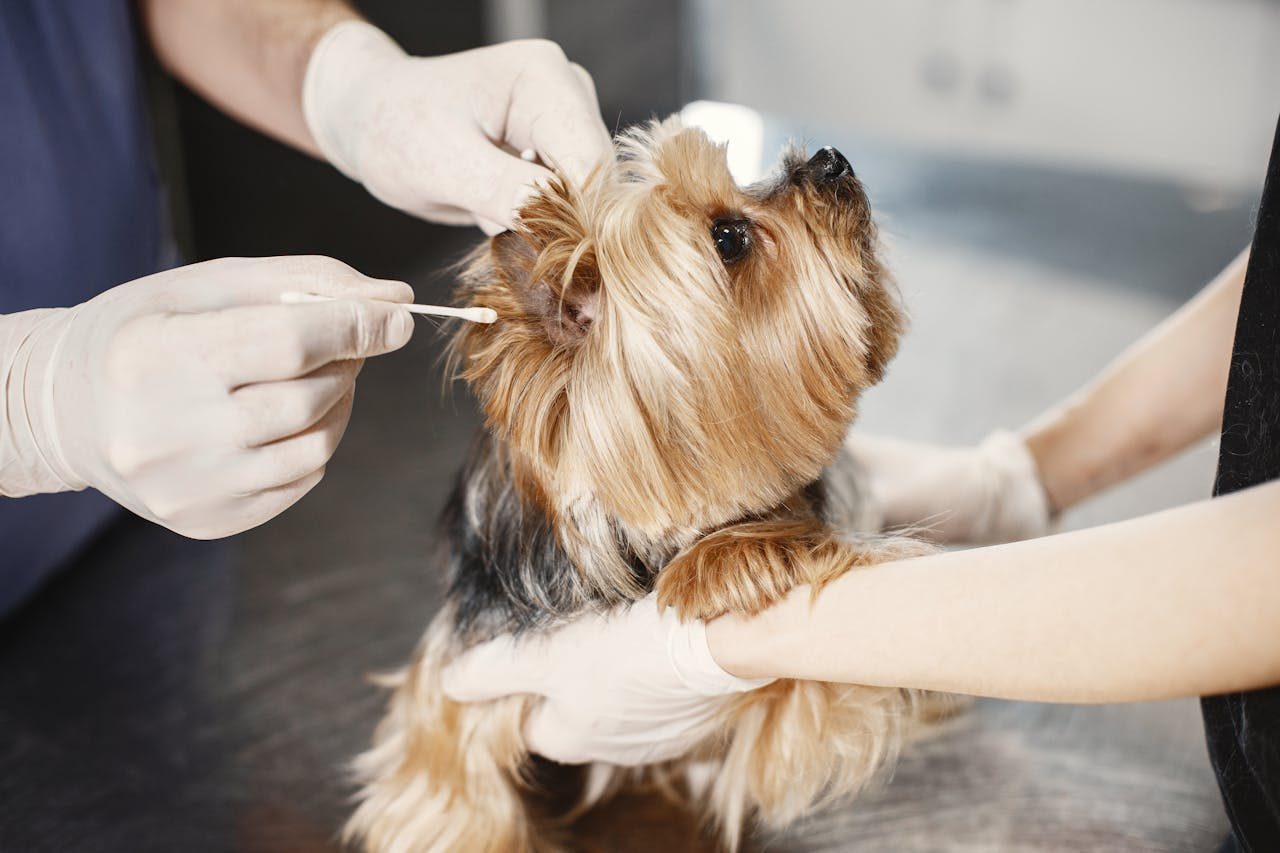
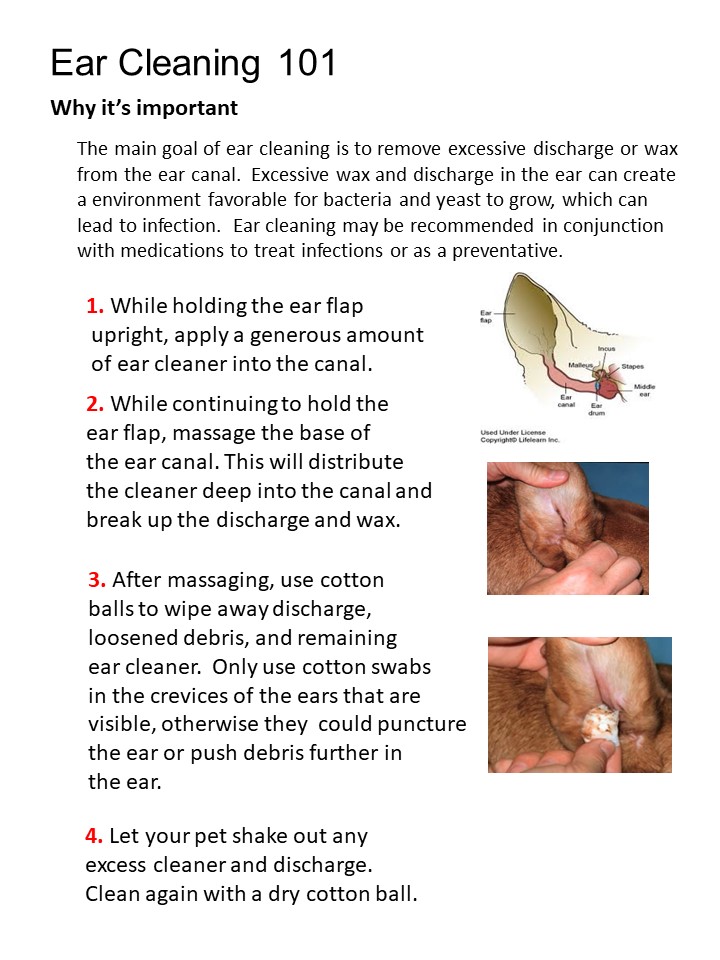
Apply The Cleaning Solution
Once you have everything ready and the environment is calm, apply the ear cleaning solution. Gently squeeze a few drops into your dog’s ear canal without forcing it. Make sure to follow the instructions on the product label.
Massage The Base Of The Ear
After applying the solution, massage the base of your dog’s ear for about 20-30 seconds. This helps to break up debris and wax inside. You might hear a squishing sound—this is normal and indicates that the solution is working.
Wipe Away Debris
Now it’s time to clean up. Use a cotton ball or gauze to gently wipe the inside of your dog’s ear. Avoid pushing anything deep into the ear canal. Focus on the visible areas and remove any excess wax or dirt.
Reward Your Dog
Don’t forget to praise and reward your dog after the cleaning session. Offer a treat or some affection to make the experience positive. This helps your dog associate ear cleaning with good feelings.
Regular Maintenance
Establish a routine for ear cleaning. Depending on your dog’s breed and activities, aim for every 1-4 weeks. Regular maintenance can prevent buildup and infections. Have you noticed any changes in your dog’s ear health recently? Observing your dog’s ear condition can provide valuable insights.
Best Practices For Routine Care
Keeping your dog’s ears clean is essential for their overall health. Establishing a routine ear cleaning practice can prevent infections and discomfort. Here are some best practices for caring for your dog’s ears.
Choose The Right Cleaning Solution
Select a vet-recommended ear cleaning solution. Avoid homemade remedies unless advised by your veterinarian. Ensure the solution is specifically designed for dogs, as human products may contain harmful ingredients.
Gather Your Supplies
Before starting, gather all necessary supplies. You’ll need:
- Ear cleaning solution
- Soft cotton balls or gauze
- Treats for positive reinforcement
- A towel to catch any mess
Create A Calm Environment
Choose a quiet space for ear cleaning. Your dog may feel anxious, so a calm atmosphere will help. Play soothing music or use treats to keep your dog relaxed.
Inspect The Ears
Before cleaning, take a moment to inspect your dog’s ears. Look for redness, swelling, or foul odor. These signs may indicate an infection, and you should consult your vet before proceeding.
Apply The Cleaning Solution
Gently lift your dog’s ear flap and apply the cleaning solution. Follow the instructions on the product label. Be careful not to insert the nozzle too far into the ear canal.
Massage The Base Of The Ear
After applying the solution, massage the base of the ear for about 30 seconds. This helps the solution break down wax and debris. You may hear a squishing sound, which is perfectly normal.
Wipe Away Debris
Use a cotton ball or gauze to wipe the visible part of the ear. Avoid pushing debris further into the ear canal. If you notice a lot of dark or smelly discharge, consult your vet.
Reward Your Dog
After cleaning, reward your dog with a treat and praise. Positive reinforcement encourages your dog to associate ear cleaning with good experiences. This helps make future cleanings easier.
Frequency Of Cleaning
How often should you clean your dog’s ears? It largely depends on their breed and lifestyle. Dogs with floppy ears or those that swim frequently may require more frequent cleanings.
Regular ear cleaning can prevent serious issues down the line. Have you established a routine for your dog’s ear care? Consider the benefits of a proactive approach to their health.
Avoiding Cleaning Mistakes
Cleaning your dog’s ears is important. Avoiding mistakes during this process is crucial. Common errors can lead to pain or infection. Here are some tips to help you clean safely.
Don’t Use Q-tips
Q-tips can push dirt deeper into the ear canal. This can cause blockages or injuries. Instead, use a soft cloth or a cotton ball. Wipe the outer ear gently.
Avoid Harsh Cleaners
Harsh chemicals can harm your dog’s ears. Alcohol and hydrogen peroxide can irritate sensitive skin. Stick to vet-recommended cleaning solutions. Natural options are often safer.
Don’t Over-clean
Over-cleaning can lead to dryness. It can also upset the natural balance of ear wax. Clean only when necessary. Regular checks are better than frequent cleaning.
Watch For Signs Of Infection
Look for redness, swelling, or discharge. These may indicate an infection. If you notice these signs, consult your vet. Early treatment can prevent serious problems.
Be Gentle
Dogs have sensitive ears. Use a soft touch during cleaning. Pulling or tugging can cause pain. Calm your dog to make the process easier.
Understanding Earwax Colors
Earwax colors in dogs can tell you a lot about their ear health. Light yellow may be normal, while dark brown or black could indicate an infection. Understanding these colors helps you decide when to clean your dog’s ears or seek veterinary advice.
Understanding Earwax Colors Dog earwax can tell you a lot about your furry friend’s ear health. The color and consistency of the wax are indicators of what might be going on inside those adorable ears. You might be surprised by how much you can learn just by paying attention to earwax colors.
Normal Earwax: Light Yellow To Tan
Healthy earwax typically appears light yellow to tan. This wax acts as a natural barrier, protecting your dog’s ears from dirt and debris. It’s essential to keep an eye on this color. If you notice a change, it could signal a problem.
Brown Earwax: Possible Build-up
Brown earwax can indicate a buildup of healthy wax. However, it might also suggest that your dog’s ears need a good cleaning. One time, I noticed my dog had darker wax than usual. A gentle wipe with a warm cloth cleared it up, preventing further issues.
Dark Brown Or Reddish-brown: Potential Infection
Dark brown or reddish-brown earwax often points to a yeast infection. This wax might appear greasy and could have a foul smell. If your dog is shaking their head or scratching their ears, it’s time for a vet visit.
Black Earwax: Serious Concerns
Black, waxy, or crusty discharge can be alarming. This type of earwax may signal an ear infection or ear mites. Look for other symptoms like redness or a bad odor. Don’t delay seeking professional help if you notice these signs.
Clear Or Watery Earwax: Allergies Or Irritation
Clear or watery earwax can suggest allergies or irritation. This wax might appear more liquid than solid. Is your dog experiencing any itching or discomfort? It might be time to consider allergens in their environment. Keeping an eye on your dog’s earwax can be a simple yet effective way to maintain ear health. Understanding these colors helps you take action when needed. What color is your dog’s earwax today?
Recognizing Serious Conditions
Keeping your dog’s ears clean is important. Sometimes, problems can arise. Recognizing serious conditions early can help. It can prevent further health issues for your dog.
Watch for signs that indicate something is wrong. Changes in your dog’s ears may mean a serious problem. Understanding these signs can lead to timely care.
Common Symptoms Of Ear Issues
Pay attention to any unusual behavior. Scratching at the ears is a common sign. Shaking their head frequently can also indicate discomfort. Look for redness or swelling in the ear canal.
Discharge from the ear is another key symptom. This can be brown, yellow, or black. Foul odors coming from the ear can signal an infection. A sudden change in your dog’s behavior could also be a warning sign.
Understanding Ear Infections
Ear infections are frequent issues in dogs. They can be caused by bacteria or yeast. Allergies and moisture can also trigger infections. If left untreated, infections can worsen quickly.
Watch for signs like excessive scratching or whining. Dogs may show signs of pain when you touch their ears. Early treatment is vital to avoid severe complications.
The Role Of Ear Mites
Ear mites are tiny parasites that can cause problems. They lead to intense itching and discomfort. You may notice dark, crumbly debris in the ear. This looks similar to coffee grounds.
Inspect your dog’s ears regularly. If you suspect ear mites, seek veterinary help. They can provide proper treatment to eliminate the pests.
Foreign Bodies And Their Effects
Sometimes, foreign objects can get stuck in the ear. Grass awns and small debris can cause irritation. This may lead to infections or other serious issues.
Look for signs of distress in your dog. If they seem to be in pain, check their ears. A vet can safely remove foreign bodies and treat any resulting problems.
Preventive Measures For Healthy Ears
Maintaining your dog’s ear health is crucial for their overall well-being. Preventive measures can help you avoid painful infections and discomfort. By being proactive, you can ensure your furry friend has happy, healthy ears.
Regular Inspections
Make it a habit to check your dog’s ears weekly. Look for redness, swelling, or unusual discharge. Catching issues early can prevent serious problems.
- Check for dirt or wax build-up.
- Monitor for bad odors, which may indicate infection.
- Pay attention to your dog’s behavior; scratching or shaking their head often can signal discomfort.
Proper Cleaning Techniques
Cleaning your dog’s ears doesn’t have to be a chore. Use a vet-recommended ear cleaner for a safe approach. Avoid cotton swabs; they can push debris deeper into the ear canal.
Instead, use a soft cloth or gauze. Wipe the outer ear gently, and let the cleaner do its job without over-inserting anything into the ear. This simple routine can prevent many ear issues.
Keep Ears Dry
Moisture is a breeding ground for bacteria and yeast. After baths or swimming, dry your dog’s ears thoroughly. You can use a soft towel or cotton ball to absorb excess moisture.
Consider using a drying solution if your dog enjoys swimming often. Keeping their ears dry can significantly reduce the risk of infections.
Maintain A Healthy Diet
Your dog’s diet plays a vital role in their ear health. A balanced diet strengthens their immune system and can reduce allergies, which are often a cause of ear problems. Consult your vet about the best food options for your dog.
Adding omega fatty acids can also promote skin health, which includes the ears. Ask yourself, is your dog getting the nutrition they need to stay healthy?
Consult Your Veterinarian
Regular check-ups with your vet can be a game-changer for your dog’s ear health. They can spot problems you might miss and offer tailored advice. If your dog is prone to ear issues, ask your vet about preventive treatments.
Don’t hesitate to seek professional help if you notice any changes in your dog’s ear condition. Early intervention often leads to better outcomes.

Credit: www.petful.com
When To Visit A Veterinarian
Monitoring your dog’s ear health is vital. Some signs indicate a need for veterinary help. Ignoring these signs can lead to serious issues. Quick action can save your dog from discomfort.
Persistent Discomfort
If your dog shows signs of pain, seek help. Symptoms include shaking the head or scratching the ears. Watch for whining or sensitivity when touching their ears. These may indicate an underlying problem.
Strange Odors
Unpleasant smells from your dog’s ears are a red flag. A foul odor often signals an infection. Do not ignore this symptom. A vet can diagnose and treat the issue effectively.
Discharge Color Changes
Dark brown or black discharge is concerning. This may suggest an infection or ear mites. Clear or yellow discharge can also be problematic. Bring your dog to a vet for evaluation.
Excessive Wax Build-up
Some dogs produce more ear wax than others. Regular cleaning may not be enough. If you notice excessive wax, consult a veterinarian. They can determine the best cleaning method.
Visible Redness Or Swelling
Redness or swelling in the ear canal is alarming. This often indicates inflammation or infection. Prompt veterinary attention is necessary. Early treatment can prevent further complications.
Behavior Changes
Watch for changes in your dog’s behavior. Increased irritability or lethargy can be signs of pain. If your dog is not acting like themselves, seek veterinary help. A thorough check-up is crucial.
Credit: vetic.in
Frequently Asked Questions
What Is The Best Way To Clean Out Your Dog’s Ears?
To clean your dog’s ears, use a vet-approved ear cleaner. Apply the solution, gently massage the base of the ear, then wipe away debris with a cotton ball. Avoid using Q-tips or inserting anything into the ear canal. Regular checks can prevent infections and ensure ear health.
How Do You Get Brown Gunk Out Of A Dog’s Ear?
To remove brown gunk from your dog’s ear, use a warm, damp cloth to gently wipe the area. Avoid inserting objects into the ear canal. If the problem persists or if you notice odor, consult a veterinarian for proper diagnosis and treatment.
Regular cleaning helps maintain ear health.
What Not To Do When Cleaning Dog Ears?
Avoid using Q-tips or inserting anything into the ear canal. Never use alcohol-based cleaners or hydrogen peroxide. Don’t apply excessive pressure while cleaning. Skip cleaning if your dog shows signs of pain or discomfort. Consult a vet for persistent issues instead of self-treating.
What Is The Black Stuff In My Dog’s Ears?
The black stuff in your dog’s ears may be wax, dirt, or discharge from infections or mites. Common causes include ear infections, allergies, or foreign bodies. Consult a veterinarian for proper diagnosis and treatment to ensure your dog’s ear health.
How Often Should I Clean My Dog’s Ears?
Clean your dog’s ears once a month or as needed.
What Is The Best Way To Clean Dog Ears?
Use a vet-approved cleaner and a soft cloth for cleaning.
Can I Use Cotton Swabs To Clean My Dog’s Ears?
Avoid using cotton swabs; they can push dirt deeper.
What Are Signs Of Dirty Dog Ears?
Signs include odor, redness, swelling, or excessive scratching.
How Do I Remove Wax From My Dog’s Ears?
Gently wipe with a damp cloth and use ear cleaner.
What Causes Brown Discharge In Dog Ears?
Brown discharge may indicate earwax buildup or infection.
Conclusion
Maintaining your dog’s ear health is vital. Regular cleaning prevents infections and discomfort. Use gentle methods to keep your dog’s ears clean. Always check for signs of issues, like unusual discharge or odor. Consult your vet if you notice anything concerning.
Remember, a little care goes a long way. Happy ear cleaning! Your furry friend will thank you.