Keeping your dog nails trimmed is not just about aesthetics; it’s a vital part of their overall health and well-being. You might find the task daunting or even a bit scary, but it doesn’t have to be.
This Dog Nail Trimming Guide is designed for you, whether you’re a seasoned pet owner or a first-time dog parent. You’ll discover practical tips and techniques that make nail trimming simple and stress-free for both you and your furry friend.
Imagine the satisfaction of confidently handling nail trimming at home, saving both time and money. Plus, regular nail care can prevent painful overgrowth and associated health issues. With this guide, you’ll learn how to identify the quick, choose the right tools, and create a positive experience for your dog. By the end of this article, you’ll feel empowered and ready to tackle nail trimming like a pro. Let’s dive in and make nail trimming a breeze for you and your pup!

Credit: www.youtube.com
Preparation For Nail Trimming
Preparing for dog nail trimming is an essential step to ensure a smooth and stress-free experience for both you and your furry friend. Many pet owners dread this task, but with the right preparation, it can become a manageable routine. Let’s break down the key elements to get you ready for this important grooming session.
Gather Your Supplies
Before you start, make sure you have everything you need. Here’s a checklist of items to gather:
- Nail Clippers:Choose a type that feels comfortable in your hand.
- Styptic Powder:This will help stop any bleeding if you accidentally cut too short.
- Treats:Use these to reward your dog and create a positive association.
- File or Grinder:For smoothing out any rough edges after trimming.
Having these items at hand will reduce stress and help you feel more confident. It’s worth investing in quality tools that will make the job easier. Have you ever tried trimming your dog’s nails with dull clippers? It’s not fun for anyone!
Choose The Right Location
The environment plays a huge role in how your dog reacts during nail trimming. Pick a quiet, well-lit area where your dog feels comfortable. Avoid high-traffic zones that may cause distractions.
Consider using a non-slip surface like a mat. This will prevent your dog from slipping and making the process more difficult. Have you noticed how a calm setting can make a world of difference?
Familiarize Your Dog With The Process
Before you even reach for the clippers, take some time to get your dog used to the idea. Start by gently holding their paws and massaging them. This helps reduce anxiety and builds trust.
Introduce the clippers slowly. Let your dog sniff them and reward them with treats. Gradually mimic the motion of trimming without actually cutting their nails. Has your dog ever shown signs of nervousness? This technique can be a game-changer!
Have A Helper Ready
If your dog tends to wiggle or fidget, it can be helpful to have someone assist you. One person can hold the dog while the other focuses on trimming. This teamwork can make the process quicker and less stressful.
Make sure the helper is calm and confident. Dogs can sense anxiety and may become more anxious themselves. Have you ever noticed how your pet reacts to your mood?
By ensuring you’re well-prepared, you set the stage for a successful nail trimming session. Your dog will appreciate the effort, and you’ll feel accomplished. What are your thoughts on making nail trimming a regular part of your grooming routine?
Credit: tractive.com
Choosing The Right Tools
Choosing the right tools for dog nail trimming is essential for a safe and effective grooming experience. The right equipment not only makes the task easier but also ensures your dog’s comfort and safety. With so many options available, how do you decide what to use?
Types Of Nail Clippers
There are mainly three types of nail clippers you can choose from:
- Scissor-style clippers:These resemble a pair of scissors and are great for larger dogs with thick nails.
- Guillotine-style clippers:These have a hole where you place the nail. As you squeeze the handle, a blade cuts through the nail. Ideal for smaller breeds.
- Electric nail grinders:These tools sand down the nails gradually, which can reduce the risk of cutting too deep.
Consider your dog’s size and nail thickness when selecting clippers. A friend of mine had a small dog and used guillotine-style clippers. It was quick and easy, making the process less stressful for both of them.
Safety Features To Look For
Safety should be a top priority when selecting nail trimming tools. Here are some features to consider:
- Safety guards:Many clippers come with a guard to prevent cutting too much of the nail.
- Non-slip handles:Look for grips that feel comfortable in your hand to prevent slips.
- Built-in lights:Some electric grinders have LED lights to help you see better.
These features can make a significant difference during the trimming process. I remember trimming my dog’s nails in poor lighting. It was challenging to see the quick, and I regretted not using a tool with a built-in light.
Additional Tools For A Smooth Experience
Besides clippers, consider adding these tools to your grooming kit:
- Dog nail file:A good file can help smooth out any rough edges after clipping.
- Styptic powder:This is crucial in case you accidentally cut the quick. It helps stop the bleeding.
- Treats:Keep some treats handy to reward your dog after each nail trim.
Having these additional tools can ease your worries. The first time I trimmed my dog’s nails, I didn’t have styptic powder on hand. Thankfully, I didn’t cut too close, but it was a lesson learned!
What tools have you found most helpful for trimming your dog’s nails? Your experience could help others make the right choices.
Understanding Nail Anatomy
Understanding nail anatomy is key for effective dog nail trimming. Knowing where the quick is located helps prevent cutting too deep. A well-trimmed nail keeps your dog comfortable and promotes healthy paws. Follow this guide to ensure a safe and stress-free experience for both you and your pet.
Understanding Nail Anatomy is crucial for successful and safe dog nail trimming. It helps you recognize the different parts of a dog’s nails and ensures you avoid cutting into sensitive areas, like the quick. Knowing the anatomy can make the experience less stressful for both you and your furry friend.
What Are Dog Nails Made Of?
Dog nails are primarily made of a tough protein called keratin. This is the same material found in human nails and hair. Nails have three main parts:
- Cuticle:The hard outer layer that protects the nail.
- Quick:The sensitive inner part containing nerves and blood vessels.
- Nail Bed:The skin beneath the nail that supports its growth.
Understanding these components helps you know where to trim and how to keep your dog comfortable.
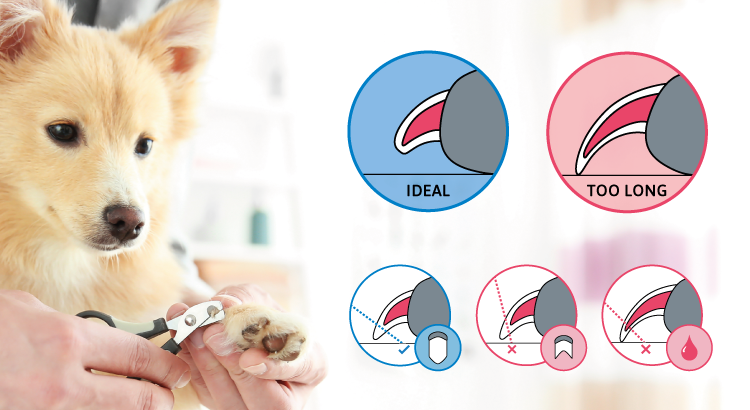
Identifying The Quick
The quick is a vital part of your dog’s nail. It’s sensitive and can bleed if cut. You can identify the quick in dogs with white nails easily as it’s visible as a pinkish area. For dogs with dark nails, it’s trickier.
- Shine a flashlight underneath the nail to spot the quick.
- Look for a small dark circle in the center as you trim.
Being cautious around the quick will save you from accidents and help your dog stay calm during nail trimming.
Common Nail Issues To Watch For
Just like humans, dogs can face nail problems. Some common issues include:
- Splitting:Can occur due to dry conditions or excessive wear.
- Infections:Bacteria can enter through cracks in the nail.
- Ingrown Nails:These can cause pain and discomfort.
Regular inspections help you catch these problems early. Have you noticed anything unusual about your dog’s nails lately? Understanding your dog’s nail anatomy not only makes trimming easier but also ensures their overall health and comfort. Keep an eye on your dog’s nails, and you’ll both enjoy a more pleasant grooming experience.
How To Identify The Quick
Identifying the quick in your dog’s nails is crucial for safe trimming. For dogs with white nails, look for the pinkish area. On dark nails, shine a flashlight to reveal the nail’s structure or watch for a small dark dot as you trim, indicating the quick’s location.
Identifying the quick is a crucial step in dog nail trimming. The quick is the sensitive part of the nail containing nerves and blood vessels. If you accidentally cut into it, it can cause pain and bleeding. Understanding how to locate the quick helps you trim safely and effectively, ensuring your dog’s comfort.
Understanding The Quick
The quick is typically pink in dogs with light-colored nails. This makes it easier to see and avoid while trimming. If your dog has dark nails, identifying the quick can be more challenging.
Locating The Quick In Dark Dog Nails
- Shine a flashlight:Use a flashlight or your phone’s light to illuminate the nail from underneath. This can help reveal the quick’s location.
- Look for a dark circle:As you trim the nail, watch for a small dark circle or dot in the center of the nail’s cut surface. This indicates you’re getting close to the quick.
- Trim in small increments:Always trim a little at a time. This cautious approach reduces the risk of cutting into the quick.
Tips For Trimming Safely
Take your time. Rushing can lead to mistakes. If you’re unsure, stop and reassess. Consider using a nail grinder instead of clippers. Grinders allow for more control and help you avoid cutting into the quick. Have styptic powder handy. This can quickly stop bleeding if you accidentally cut the quick.
Why It Matters
Trimming your dog’s nails is essential for their health. Long nails can cause discomfort and even lead to injury. Have you ever seen your dog struggle to walk on hard surfaces? This is often due to overgrown nails. By learning to identify the quick, you’re taking a big step toward ensuring your dog’s well-being. Keeping their nails at a healthy length helps them stay active and happy. Being proactive in nail care not only keeps your dog comfortable but also strengthens your bond. When you take the time to learn and practice, you show your dog that you care about their health and happiness.
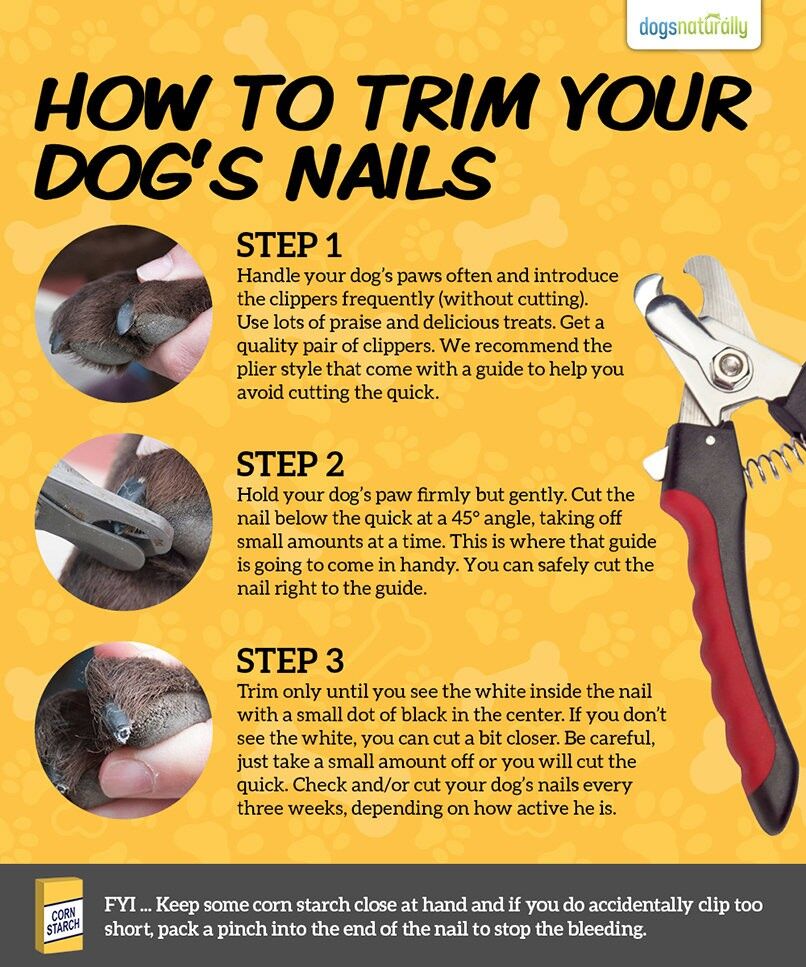
Step-by-step Trimming Process
Trimming your dog’s nails can seem difficult. A clear process makes it easier. Follow these steps for a smooth experience.
Gather Your Supplies
Start by collecting everything you need. Use dog nail clippers or a grinder. Have treats ready for rewards. Keep a towel nearby to catch nail clippings.
Choose A Comfortable Spot
Select a quiet area for trimming. Make sure your dog feels safe. Sit on the floor or use a low table. This helps you control the situation better.
Get Your Dog Settled
Calm your dog before starting. Pet them gently and talk softly. Let them sniff the clippers. This helps reduce anxiety.
Inspect The Nails
Look closely at each nail. Find the quick, the pink part inside the nail. Avoid cutting into the quick. It can hurt and bleed.
Trim A Small Amount
Start with a small trim. Cut the tip of the nail first. Do not rush. Keep checking the quick as you trim.
Use Treats For Positive Reinforcement
Reward your dog after each nail. Give them treats or praise. This builds a positive association with nail trimming.
Take Breaks If Needed
If your dog gets anxious, take a break. Let them relax before continuing. Trimming should be a calm process.
Finish Up And Clean
Once all nails are trimmed, clean up the area. Dispose of nail clippings properly. Give your dog extra love and treats for a job well done.
Tips For Nervous Dogs
Nail trimming can be stressful for nervous dogs. They may fear the sound of clippers or the sensation of having their paws held. Understanding how to help them feel safe is key. Here are some effective tips to ease their anxiety.
Start Slowly
Take your time with nervous dogs. Begin by letting them sniff the clippers. Allow them to explore the tools without pressure. This builds trust and familiarity.
Create A Calm Environment
Choose a quiet space for nail trimming. Minimize distractions like loud noises or other pets. Soft music can help soothe your dog. This calm setting makes the process easier.
Use Positive Reinforcement
Reward your dog with treats or praise. Give them a small treat after each nail is trimmed. This encourages good behavior and reduces fear.
Practice Handling Their Paws
Get your dog used to having their paws touched. Gently hold their paws during playtime. This can help them feel more comfortable during the actual trimming.
Take Breaks
Don’t rush the process. If your dog shows signs of stress, take a break. Allow them to relax before continuing. Short sessions can make trimming less overwhelming.
Consider Professional Help
If trimming at home proves too difficult, seek professional help. A groomer or vet can assist with nail trimming. They know how to handle nervous dogs effectively.
Using A Dremel For Nail Care
Trimming your dog’s nails is essential for their health. A Dremel tool can make this task easier. This tool helps you grind down the nails smoothly. It reduces the risk of cutting the quick. Many pet owners find it less stressful for their dogs. Let’s explore how to use a Dremel effectively.
Benefits Of Using A Dremel
A Dremel offers several advantages over traditional clippers. It provides a smooth finish to the nails. This prevents sharp edges that can cause injury. It also allows for better control. You can see exactly how much nail you are removing.
The noise from a Dremel might worry some dogs. Most dogs adapt quickly to the sound. Start by letting your dog hear the Dremel while it is off. Reward them with treats to create a positive experience.
Preparing Your Dog
Before using a Dremel, prepare your dog. Make sure they are calm and comfortable. Sit beside them on the floor or a comfortable surface. Gently hold one of their paws. This helps your dog get used to the process.
Consider using treats or toys to distract your dog. This can help reduce anxiety. You want your dog to associate the Dremel with something positive.
Using The Dremel Safely
Safety is important when using a Dremel. Keep the tool steady and at the right angle. Avoid pressing too hard against the nail. This can cause discomfort. Start with a slow speed setting. Gradually increase the speed as you gain confidence.
Always check the nail for the quick. Take breaks if your dog seems uncomfortable. It’s better to take your time than rush the process.
Post-trimming Care
After trimming, check your dog’s nails. Ensure there are no rough edges. If you notice any, use the Dremel to smooth them out. Offer your dog praise and more treats. This reinforces a positive association with nail trimming.
Regular nail care is important. Using a Dremel can make this task easier and more comfortable for your dog. With practice, both you and your dog will get used to it.
Safety Measures To Follow
Trimming your dog’s nails requires care and attention. Always use sharp, clean tools to prevent injury. Keep your dog calm and comfortable during the process to ensure safety for both of you. Regular nail maintenance promotes healthy paws and prevents discomfort.
When it comes to trimming your dog’s nails, safety should always be your top priority. Both you and your furry friend need to feel comfortable during the process. Taking the right safety measures can prevent accidents and ensure a positive experience for both of you. Here’s how to keep things safe and stress-free.
Prepare Your Workspace
Create a calm environment for nail trimming. Choose a well-lit area where you can see clearly. Keep all your tools within reach, including:
- Nail clippers
- Styptic powder (for bleeding)
- Dog treats (for positive reinforcement)
A clutter-free space helps reduce distractions and keeps your dog calm.
Choose The Right Tools
Using the right tools can make all the difference. Invest in high-quality nail clippers designed for dogs. Consider these options:
- Guillotine-style clippers
- Scissor-type clippers
- Electric grinders
Each tool has its advantages, so choose one that feels comfortable for you to use.
Know The Anatomy Of The Nail
Understanding your dog’s nail structure is crucial. The “quick” is the sensitive part containing nerves and blood vessels. Identifying the quick can prevent painful accidents. For dogs with light-colored nails, the quick appears as a pinkish area. For darker nails, look for a small dark circle as you trim. This knowledge will help you trim safely and effectively.
Use Positive Reinforcement
Keeping your dog relaxed is essential. Use treats to reward your dog during and after the trimming process. This not only builds trust but also makes future nail trims easier. Have you ever noticed how a simple treat can change your dog’s attitude? It works wonders!
Have A Helper If Needed
If your dog is particularly anxious or wiggly, consider having someone assist you. A helper can gently hold your dog still while you focus on trimming. This extra pair of hands can make the process smoother. Plus, it can help keep your dog calm. Taking these safety measures can turn nail trimming from a daunting task into a manageable routine. Your dog’s comfort and safety should always come first. What safety steps will you take next time you trim your dog’s nails?
Dealing With Accidental Cuts
Trimming your dog’s nails can be tricky. Accidental cuts happen. Knowing what to do can help. Quick action can ease your worries. Follow these simple steps to handle cuts safely.
Stay Calm And Assess The Situation
Your dog may react to a cut. Stay calm to help soothe them. Check the nail to see how deep the cut is. If it bleeds, don’t panic. Most cuts are minor.
Stop The Bleeding
To stop the bleeding, apply pressure. Use a clean cloth or gauze. Hold it against the cut for a few minutes. You can also use a styptic powder. This helps to clot the blood quickly.
Clean The Cut
After the bleeding stops, clean the area. Use warm water and mild soap. Rinse gently and dry the paw. Keeping it clean helps prevent infection.
Monitor For Signs Of Infection
Watch for signs of infection. Look for swelling, redness, or discharge. If you notice any of these, contact your vet. They can provide the right treatment.
Keep Your Dog Comfortable
Make your dog comfortable after the cut. Offer them a quiet place to rest. Keep them calm and relaxed. This will help them heal faster.
Learn From The Experience
Accidental cuts can be a learning moment. Review your trimming technique. Take your time next time. Consider using a nail grinder for better control.
Credit: www.dogsnaturallymagazine.com
When To Seek Professional Help
Dog nail trimming can be stressful for some pets and owners. Knowing when to seek professional help is important. Certain signs indicate it’s time to call a vet or groomer.
Signs Of Stress Or Fear
Watch your dog closely during nail trimming. Signs of stress include excessive barking, growling, or trying to escape. If your dog shows fear or aggression, stop trimming.
Inability To Trim The Nails
Some dogs resist nail trimming despite your efforts. If your dog fights you or becomes very anxious, consider getting help. A professional can handle your pet safely.
Difficulty Finding The Quick
Finding the quick is crucial when trimming nails. If you struggle to identify it, seek a professional. They can show you how to avoid cutting too short.
Medical Issues
If your dog has health issues, consult a vet before trimming nails. Conditions like arthritis can make nail trimming painful for your pet. A professional can provide the care your dog needs.
After A Bad Experience
A negative experience can make future nail trims harder. If your dog had a bad trimming experience, consider professional help. They can rebuild your pet’s trust and comfort.
Frequently Asked Questions
How To Trim A Dog’s Nails For Beginners?
To trim a dog’s nails, gather your tools: dog nail clippers or a Dremel, and treats. Hold your dog securely but gently. Clip small sections of the nail, avoiding the quick. Reward your dog after each nail. Take breaks if needed.
Regular trimming keeps nails healthy and manageable.
How To Tell Where Quick Is On Dog Nails?
To identify the quick on dog nails, shine a flashlight underneath. Look for a dark circle as you trim. Trim gradually to avoid cutting the quick, and stop when you see a change in nail texture. Always prioritize your dog’s comfort during the process.
How Do I Know How Much To Cut My Dog’s Nails?
To determine how much to cut your dog’s nails, look for the quick, a pinkish area in light-colored nails. For dark nails, use a flashlight to see its structure. Trim small increments, stopping when you see a dark circle or feel a texture change.
Regular trimming keeps nails healthy.
What Is The Best Dog Nail Trimming Method?
The best dog nail trimming method involves using sharp, high-quality clippers. Trim small sections at a time, avoiding the quick. For dark nails, use a flashlight to locate the quick. Consider using a dremel for a smoother finish. Always reward your dog to create a positive experience.
How Often Should I Trim My Dog’s Nails?
Trim your dog’s nails every 3 to 6 weeks for healthy paws.
What Tools Do I Need For Nail Trimming?
Use dog nail clippers or grinders and a styptic powder for safety.
How Can I Tell If My Dog’s Nails Are Too Long?
If you hear clicking on the floor, it’s time to trim.
What Is The Quick In A Dog’s Nail?
The quick is the sensitive part that contains nerves and blood vessels.
How Do I Safely Trim My Dog’s Nails?
Hold the paw gently, avoid the quick, and trim gradually.
What If My Dog Is Scared Of Nail Trimming?
Try calming techniques, treats, or ask a professional groomer for help.
Conclusion
Regular nail trimming keeps your dog healthy and happy. It prevents discomfort and promotes better mobility. Use the right tools for safe and easy trimming. Always take your time and be gentle. If you feel unsure, seek help from a professional.
Consistency is key for a positive experience. With practice, you and your dog will feel comfortable with the process. Keep your dog’s nails short and well-maintained. Happy trimming!